
We have started a new section of the blog, presenting our polyculture profiles, some of which we are growing in our gardens and some of which we are planning to implement in the near future.
We'll start with a simple 3 species, perennial polyculture that produces a bounty of asparagus for us each year provides habitat for wildlife is easy to establish, and requires relatively low maintenance.
It will probably be helpful to look over this Polyculture Profile Layout post before or after reading, where we provide a description of the profile layout and some general notes to consider should you wish to try to grow the polyculture yourself.
.jpg)
Polyculture Name - Plutus - Perennial Productive
Intro - Plutus is a three-species perennial vegetable polyculture of Asparagus officinalis - Asparagus ,Allium tuberosum - Garlic Chives and Fragaria x ananassa - Strawberry that we have been growing in our market garden (Aponia).
Compatible Climate (KCC) - B (with irrigation) C - D
USDA Hardiness - 5-10
Water Needs - Irrigation required for production
Light Preferences - Full Sun/Dappled Shade
Soil Preferences - light (sandy), medium (loamy) and heavy (clay) - Fertile
Suitable pH - acid, neutral and alkaline
Layout - Island - Belt - Strip - Block
Asparagus officinalis - Asparagus 'Washington' ,Allium tuberosum - Garlic Chives and Fragaria x ananassa - Strawberry in the second year after planting Plutus

Overview Image

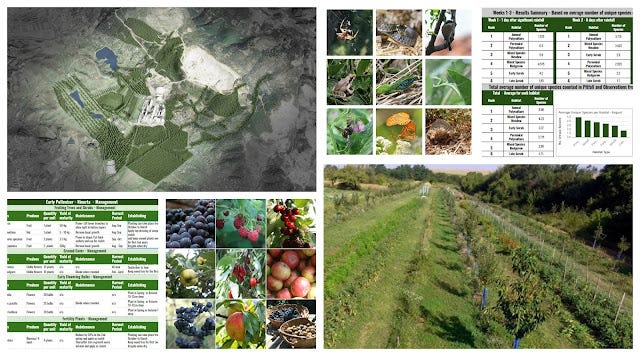
Aerial photo of our market garden (Aponia) with overlay. Plutus is located in the area circled red

Functional Components
The Asparagus can be considered the canopy in this design with Strawberry forming a ground cover to prevent weeds and the Garlic Chives planted on the south edge to take advantage of available light.
Production Potential - Asparagus can be harvested from April through to June and Garlic Chives can be cut from April-August. Garlic Chives are quite happy in dappled shade but by mid-summer the Asparagus plants can get very tall and the leaves tend to drape over the Chives. The Asparagus row that runs parallel to the chives can be contained with wires to avoid them smothering the Garlic Chives. The Strawberry ground cover will provide a small harvest of berries but nothing substantial, their main purpose being to provide ground cover. Strawberry leaves are rich in iron and vitamin C and can be harvested for teas and salads.


Habitat Potential - When left to flower Garlic Chives are extremely attractive to a range of Borgs, furthermore, the biomass cut from the Asparagus in winter and piled onto the beds as mulch provides suitable cover for many insects and spiders. We keep the bed area free from volunteer plants but encourage native growth in the pathways and alongside the edge of the beds. This wild growth provides a range of habitats for wildlife both above and below ground.
Allium tuberosum - Garlic Chives in flower in September - always attracts many species of flying insects in our gardens


Access
The polyculture is situated on a raised bed with pathways surrounding it and two keyhole paths to access the wider section of the bed. The pathways double up as irrigation channels that we flood during the dry season to irrigate the crops.
Plutus just after planting - Volunteer growth on the edge of the bed can be cut throughout the growing season providing mulch for the beds. We generally leave the wild growth untouched from Oct - March each year.

Plutus in the second year after planting out - Summer

Species List
.jpg)
Plutus in the second season after planting. F.vesca - Strawberry ground cover is forming well between A.officinalis -Asparagus

Maturation Phases

Planting
Example of planting distance between rows and plants

Flowering, Fruiting, and Maintenance Calendar
-page-001.jpg)
Regenerative Landscape Design - Online Interactive Course
Want to learn how to design, build and manage regenerative landscapes? Join us on our Regenerative Landscape Design - Online Interactive Course.
The course includes 20 lessons, with 20 hours of one-to-one mentoring/consultancy, drawn from over 20 years of experience designing, implementing and managing polyculture gardens, farms, food forests and regenerative landscapes across a variety of climate zones.
We look forward to providing you with the confidence, inspiration, and opportunity to design, build and manage landscapes that produce food and other resources for humans while enhancing biodiversity.
You can access all of the course material without the one-to-one tutoring by becoming a paid annual subscriber to our Substack, which grants you access to the Bloom Room for just 70 USD per year. Subscribe below to join now.
I look forward to having you join us!
How to establish the Perennial Vegetable Polyculture Bed
Here's how we set up the bed:
The first step was to cut the existing vegetation down and pile it next to the bed for mulch. We wait until mid-spring before cutting the existing vegetation, especially if it consists of hollow stems used by beneficial insects to lay eggs in. This gives the eggs a chance to hatch and move on to do their work in the garden.

Next, we forked over the area to relieve compaction and remove deep-rooted plants that will easily grow through a mulch. Following this we tilled the area with a Rototiller. We could have applied sheet mulch directly on top of the existing vegetation and planted in the autumn, but we had Asparagus seedlings that needed planting out so decided to go this route instead. There will probably be more weeding to do in the first year this way and we will lose some of the great natural soil structure, but it will recover by this time next year and this will be the last tilling this bed sees for a 1/4 of a century if not longer. The bed area is already quite fertile as it has been fallow for the previous 5 years with regular harvesting for hay, so we did not add any blanket application of compost.

Area rototilled using a Honda Mantis handheld machine. It took around 2.5 hrs and 300 ml of fuel to clear the area. The large clods with roots were removed by hand as they quickly clog up the tiller. Totally recommend a more powerful machine for this type of work
We then established the access and water channels which consist of paths/irrigation channels on either side of the bed and two keyhole paths in the wider sections of the bed. The bed is kinda pear shaped (literally). We are flood-irrigating this bed using a diverted mountain stream that runs along the pathways. Capillary rise draws the water into bed and gravity draws the water down. With the keyhole paths in place we can expect thorough infiltration of water into the bed and around the roots of the plants.

Keyhole pathways enable access into the center of the wider sections in the bed and allow water to permeate into this wider section
The next step is planting out. The asparagus were spaced approx. 45 cm apart and Chinese chives were planted in between the asparagus on the south edge of the bed. We then placed strawberry runners among the asparagus, the idea being to provide a ground cover and bee fodder but I'm sure we'll get a few strawberries too :) The shallow-rooted strawberries (no more than 20 cm) should not compete with the deep-rooted asparagus, the roots of which may reach depths of up to 2m. The garlic chives root in clumps around 30 - 40 cm deep.

Finally, we top-dressed each asparagus and Chinese chive with 2L of compost watered each plant well, and mulched in between the plants.

2L of compost added around the base of each plant, watered well and straw mulch applied
All in all, it took around 5 hrs for 4 of us to prepare and plant this bed and we can expect a supply of food for probably the next 25 years. With some weeding, each year and irrigation applied during dry periods it seems like time well spent :)
If you enjoyed this post, please share it :)
Want to see more of our Polyculture Profiles? Polyculture Profiles - Perennial Infrastructure Polyculture - Edible Hedge/Windbreak/Biomass - Terminus
.jpg)
Here's how we set up the bed:
The first step was to cut the existing vegetation down and pile it next to the bed for mulch. We wait until mid-spring before cutting the existing vegetation, especially if it consists of hollow stems used by beneficial insects to lay eggs in. This gives the eggs a chance to hatch and move on to do their work in the garden.

Next, we forked over the area to relieve compaction and remove deep-rooted plants that will easily grow through a mulch. Following this we tilled the area with a Rototiller. We could have applied sheet mulch directly on top of the existing vegetation and planted in the autumn, but we had Asparagus seedlings that needed planting out so decided to go this route instead. There will probably be more weeding to do in the first year this way and we will lose some of the great natural soil structure, but it will recover by this time next year and this will be the last tilling this bed sees for a 1/4 of a century if not longer. The bed area is already quite fertile as it has been fallow for the previous 5 years with regular harvesting for hay, so we did not add any blanket application of compost.
 |
| Area rototilled using a Honda Mantis handheld machine. It took around 2.5 hrs and 300 ml of fuel to clear the area. The large clods with roots were removed by hand as they quickly clog up the tiller. Totally recommend a more powerful machine for this type of work |
We then established the access and water channels which consist of paths/irrigation channels on either side of the bed and two keyhole paths in the wider sections of the bed. The bed is kinda pear shaped (literally). We are flood-irrigating this bed using a diverted mountain stream that runs along the pathways. Capillary rise draws the water into bed and gravity draws the water down. With the keyhole paths in place we can expect thorough infiltration of water into the bed and around the roots of the plants.
 |
| Keyhole pathways enable access into the center of the wider sections in the bed and allow water to permeate into this wider section |
The next step is planting out. The asparagus were spaced approx. 45 cm apart and Chinese chives were planted in between the asparagus on the south edge of the bed. We then placed strawberry runners among the asparagus, the idea being to provide a ground cover and bee fodder but I'm sure we'll get a few strawberries too :) The shallow-rooted strawberries (no more than 20 cm) should not compete with the deep-rooted asparagus, the roots of which may reach depths of up to 2m. The garlic chives root in clumps around 30 - 40 cm deep.
 |
 |
| 2L of compost added around the base of each plant, watered well and straw mulch applied |
All in all, it took around 5 hrs for 4 of us to prepare and plant this bed and we can expect a supply of food for probably the next 25 years. With some weeding, each year and irrigation applied during dry periods it seems like time well spent :)
.jpg)
Support Our Project
If you appreciate the work we are doing you can show your support in several ways.
Become a member of the Bloom Room with a $70 annual subscription to our Substack where you can access the content in our Regenerative Landscape Design Course , a member forum and more.
Make a purchase of plants or seeds from our Nursery or Online Store
Join us for one of our Onsite or Online Courses
Comment, like, and share our content. Sharing is caring !

Always inspiring. Nice!
ReplyDeletetx Ronan
Delete