We've been looking into fencing a garden , and how to meet fertility demands of the fruits, nuts, herbs and perennial vegetables on the plot without relying on animal manures and imported compost, and have come up with a polyculture that may meet both of these needs that we call the biomass belt.
What is the Biomass Belt ?
The biomass belt is a simple closed system, perennial
polyculture dedicated to growing mulch and fertilizer for annual and perennial crops.
How does it work?
The polyculture is composed of mineral accumulating comfrey in raised beds, Nitrogen fixing ground cover sown into pathways and a Nitrogen fixing hedgerow.
The comfrey is grown in raised beds for biomass
and can be cut from 4 - 7 times each year with the material being used to make
liquid fertiliser or used directly as mulch. The deep rooted comfrey mines nutrients deep in the subsoil that would otherwise wash away with the underground soil water or remain inaccessible to other plants. Some of these nutrients are relocated within the comfrey leaf and when cut and applied as mulch or converted into liquid fertiliser, the nutrients are delivered back to the top soil again accessible to crops and other plants.
The Nitrogen hungry comfrey are themselves fed with the biomass from Nitrogen fixing plants, that through a partnership with soil micro-organisms can convert atmospheric Nitrogen into Nitrogen fertilizers useful to themselves, but also becoming available to neighboring plants. For more on Nitrogen fixation
see here.
The pathways between the beds are sown with a Nitrogen fixing ground cover and mown following a comfrey cut with the trimmings applied to the comfrey beds. The hedge composed of Nitrogen fixing shrubs running parallel to the comfrey beds, once mature, is trimmed at regular intervals (once or twice per year) with the trimmings deposited onto the comfrey beds.
Each time the path vegetation and hedge are cut, root tissue underground is shed in to the soil providing significant quantities of organic matter and nutrients to the plants.
In summary, the unique ability of the Comfrey to feed deep and produce copious quantities of biomass is utilised to provide nutrients to main crops whilst the pathway ground cover and hedgerow's unique ability to fix Nitrogen is utilised to provide nutrients to the comfrey.
What follows is a design guide covering how to select a site for this polyculture, a close look at each component of the design and the species within each component, and what I hope are clear and concise instructions to build and manage this polyculture. At the end you can find a summary table and a brief description of how we have set up this polyculture in our
Polyculture Market Garden.
Want to learn more about Regenerative Landscape Design? Join The Bloom Room!
The Bloom Room is designed to create a space for more in-depth learning, for sharing projects and ideas, for seeking advice and discovering opportunities.
Ultimately, it aims to build a more intimate, interactive, and actionable relationship between members, a way for the Bloom Room community to support each other’s projects and learning journeys, and to encourage and facilitate the design, build, and management of more regenerative landscapes across our planet.
What you can expect as a member of the Bloom Room
As a member of the Bloom Room you can expect;
Access to an interactive forum where you can ask questions, direct what type of content you would like to see as well as share your own content and projects.
Monthly live session featuring general Q&A and tutorials on design software for creating and presenting polycultures.
Live session every month for members to showcase your projects, plans, designs, and gardens, with guest speakers from the community.
Full Access to all of the content on Substack
Future opportunities to join our Global Regenerative Landscape Design and Consultancy Service, with potential roles for those with the will and skill to join our design team.
An opportunity to take part in the group ownership of a Regenerative Landscape. You will find more details on that here.
Become a paid subscriber to our Substack to join. The annual subscription is currently $70 and the monthly subscription is $7 (monthly subscription excludes discounts for products and services) . You can join here, we look forward to meeting you!
Design Considerations
General - The polyculture can be situated to provide boundary hedging or subdivision hedging within a property whereby the Nitrogen fixing hedge provides a permanent living fence and the comfrey beds run adjacent to the hedge.
Light demands - For optimal growth the polyculture should be orientated along the west to east axis and be to the north of any light demanding crops to reduce shading. The plants we have selected below will grow in partial shade and on other orientations, but will yield less biomass as a result.
Water - Adequate irrigation is a key to healthy and productive plants. This polyculture is not well suited to semi wetlands and areas with a high water table and will not thrive in very dry areas with no access to irrigation. In dry land/climate, selecting a position for the polyculture that requires as little irrigation as possible is essential and can be achieved by planting on contour and using simple earthworks to keep rain water around the root zones of plants.
N.B. All of the plants we have included in the polyculture are drought tolerant (Trifolium repens to a lesser extent) and will survive long periods without water once established, but will not produce high yields of biomass in these conditions.
Subsoil Mining - Siting the biomass patch, specifically the comfrey beds, below compost toilets/manure piles and areas that are likely to receive non toxic
leachate will help prevent the loss of nutrients draining off site.
Proximity to crops - Consider the distance between your beds and where you need to apply the mulch or prepare and store the liquid fertiliser. If growing comfrey for mulch it probably doesn't make much sense having to haul the material over large distances.
Species Selection - Species selection should take into account the following;
- Climatic compatibility with the site
- Drought tolerance
- Speed of growth i.e fast growing
- Tolerance of hard pruning
- Benefits to wildlife
Ground Preparation
Raised beds are a major part of our fertility strategy and when managed properly overtime they retain water and nutrients very efficiently. This polyculture includes two 1.3 m wide raised beds surrounded by 50 cm paths and a 70 cm wide raised bed for the Nitrogen fixing hedge. It's important never to tread on the soil of a raised bed and the above dimensions allow reach within the beds from the pathways. The bed length can be as long as best fits your site and needs.
 |
| Example Perennial Polyculture - The Biomass Belt - Bed Layout |
To form the beds the area should be cleared of all plants, best achieved in most situations by sheet mulching with ample organic matter 6 months prior to planting. Pernicious perennials such as wild brambles -
Rubus fruticosus and couch grass -
Elymus repens should be dug out before mulching and the soil should be forked over as deeply as possible with a strong garden fork.
If you have a heavy clay compact soil it's best to double dig and incorporate plenty of organic matter (20- 40 L m2) into the comfrey beds before planting.
 |
| The right shape shovel for forming paths |
Once you have cleared the whole area of weeds and forked it over to relieve compaction, mark out the bed shapes with string and dig out a 10 cm layer of soil 50 cm wide to create paths around the bed, applying the soil to the surface of the planting area and thereby creating a raised section of earth that will be your bed. A flat bottomed shovel is a good tool for this job.
If you are not sheet mulching, remove all weeds, fork over the beds, cut out the pathways and apply 20 L of compost per m length of the comfrey beds and 5 L to the nitrogen fixing hedge bed. The compost should be applied to the surface and topped with a 20 cm layer of mulch.
 |
| Raised Beds in our Market Garden |
The beds are now ready for planting and the paths for sowing.
See below for details
If you have access to a stream or river you can divert a water stream into your site and use the paths for irrigation. When establishing the paths you can alter the depth and gradient to facilitate the required movement of water within the polyculture. The slower the water travels along the paths the less erosion there will be. Capillary action will draw the water deep into the beds and under ground.
Below you will find a closer look at each component in further detail based on a version of this design we have implemented in our Market Garden.
Regenerative Landscape Design - Online Interactive Course
Want to learn how to design, build and manage regenerative landscapes? Join us on our Regenerative Landscape Design - Online Interactive Course. We look forward to providing you with the confidence, inspiration, and opportunity to design, build and manage regenerative landscapes, gardens, and farms that produce food and other resources for humans while enhancing biodiversity.
You can find the course details here and at the moment we have a $350 ( 20%) discount for full enrollment to the course. Just use RLD2024 in the promo code section of the registration form to receive your discount.
The Polyculture Components
- Nitrogen Fixing Hedge
- Nitrogen Fixing Ground Cover
- Comfrey Beds
 |
| Perennial Polyculture |
1. Nitrogen Fixing Hedge
The Nitrogen fixing hedge supplies a significant biological source of Nitrogen and biomass, habitat for wildlife including a number of beneficial species, and makes an excellent living boundary/fence on the perimeter of a site or as a subdivision within a site.
The hedge is composed of three or more different species of Nitrogen fixing shrubs.
Below is a design illustration of a mature Nitrogen fixing hedge composed of Caragana arborescens, Elaeagnus umbellata and Cytisus scoparius.
 |
| Nitrogen Fixing Hedge - Biomass Belt |
Planting out the Nitrogen Fixing Hedge
Spacing - The diagram below shows the spacing between plants and distances from the edge of the beds. In order to increase Nitrogen fixation and produce biomass sooner, the young shrubs can be planted 50 cm apart and thinned to 1 m apart as they mature. If using mature potted starting plants they can be planted 1 m apart. Generally it's much better to plant out younger bare root whips over old pot bound plants. The whips soon outgrow the older plants and are far more resilient once established, not to mention the considerable savings in cost.
 |
| Illustration of newly planted Nitrogen Fixing Hedgerow |
Maintaining the Nitrogen Fixing Hedge
Formative Pruning and Trimming - If planting out single stemmed whips, the following formative pruning is necessary during or after planting out. Cut up to 1/3rd off from the top of the whips. The cut should be made just above a node and at a 45 degree angle. This will encourage the plant to form a multi stemmed crown. The following year the tips of each of the multi stems can be cut again encouraging further branching. Once the plants have developed full crowns they can be trimmed to reduce width and to the desired height at least once per year. After trimming, the arisings can be raked onto the comfrey patch.
The best time to trim the hedge is early winter when the comfrey is dormant and mid summer after the comfrey has been cut. The summer cut avoids disturbing nesting birds and provides mulch during the dry season.
 |
| Illustration of Mature Nitrogen Fixing Hedgerow |
Feeding - These plants will not require any feeding, however mulching with a 30 cm diameter mulch mat or card/straw mulch whilst the plants are establishing for the first 2-3 years will be beneficial both in reducing irrigation needs and preventing weed competition.
Irrigation - The first season after planting, irrigation should be applied when the soil beneath the mulch is dry. In following years irrigation is only necessary during very dry summers and should be applied before the plants reach wilting point. The plants will grow much faster and produce significantly more biomass if they have a good supply of water.
Native wild plants that emerge around the shrubs(apart from grasses) can be left to grow freely once the shrubs have matured and if they are not directly competing.
Nitrogen Fixing Hedge - Species Overview
Caragana arborescens - Siberian Pea Tree / Pea Tree / Pea Shrub
 |
| Permaculture Plant - Caragana arborescens |
Overview: A deciduous shrub originating from Central Asia belonging to the Fabaceae (legume) family growing to 5-6m high and 4m wide with an upright habit. It grows vigorously. Flowers are borne from buds on the previous year's wood and are typical of flowers from this family. Flowering occurs in May. Pollination is via bees, usually wild bumble bees. Pods develop from flowers - looking like small pea pods, they are 4-5 cm long. The pods ripen to amber or brown from June -July onwards and seeds fall by August. The plant is extremely hardy tolerating winter temperatures of -40 Hardiness zone 2. Prefers a continental climate with hot dry summers and cold winters.
Uses: The young pods are eaten as a vegetable, lightly cooked. The pods become tough later in the season. The seeds are rich in fats and proteins (12% and 36% respectively) about the size of lentils and can be cooked and used in any way that beans are used (the cooked flavour is somewhat bland, so best used in spicy dishes). The young raw seeds have a pea-like flavour although it is not clear whether they should be eaten raw in much quantity. Widely used in windbreaks and shelter belts and used in wildlife-erosion control plantings stabilizing soil with an extensive root system. Good wildlife fodder and can be used to as poultry food. A fiber is obtained from the bark and used for rope making.
Nitrogen Fixing Potential: The species is classified by USDA as being a MEDIUM Nitrogen fixer with estimated yields of 85-160lbs/acre or 39-72kg/4050m² or
14 g/m2
Biodiversity - The shrubs will begin to flower in the 4th or 5th year after planting and are attractive to a wide range of pollen and nectar feeding invertebrates from Apil - May.
In time as the hedge thickens up with regular pruning, suitable nesting habitat will form inside the lower part of the hedge. Birds such as Wren -
Troglodytes troglodytes, Chiffchaff -
Phylloscopus collybita and Robin -
Erithacus rubecula are commonly found in dense low hedging. These birds can help to keep common vegetable pest populations low.
Propagation: Seed propagation is the norm. Seeds germinate better after a short period of stratification and/or soaking in warm water prior to planting.
Planting Material – 5 year old plants will provide an instant hedge effect but can prove to be expensive when planting out large areas. 2nd - 3rd year whips are cost effective and with proper pruning and some attention during the first few years of development will quickly fill out.
These plants are easy to grow from seed. The first 2 years of growth are slow and they are best kept in nursery beds until approx 30 - 50 cm tall when they can be planted out into their permanent positions.
We supply seeds and 2-3 yr Caragana arborecens plants from our plant nursery.
Click here for more info.
Cytisus scoparius - Broom / Scotch Broom / Common Broom
 |
| Nitrogen Fixing Shrub - Cytisus scoparius |
Overview: A hardy Nitrogen fixing shrub native to Europe growing to 2.4 m by 1 m at a fast rate. Its bright yellow flowers appear in spring, from May to June and attract a range of invertebrates. A versatile plant well suited to many soil types that can grow in nutritionally poor soil. Prefers a sunny position but tolerates some shade and will succeed in exposed conditions including maritime exposure. A deep root system means they are very drought tolerant once established and grow well on dry banks. Very tolerant of cutting, it regenerates quickly from the base.
Uses: A good bee plant. An excellent fibre is obtained the branches. A yellow and a brown dye are obtained from the bark. A yellow dye is obtained from the flowering stem. A green dye is obtained from the leaves and young tops. The branches are used to make baskets, brushes and brooms. An essential oil from the flowers is used in perfumery. The stems of the plants are quite tough and are not easy to cut into small pieces with secateurs. This is what makes these plants great for fiber, basketry and good brooms. You can either place them on the ground and go over them with a rotary lawn mower to break the biomass into smaller pieces or leave as rough mulch.
Nitrogen Fixing Potential: The species is classified by USDA as being a HIGH Nitrogen fixer with estimated yields of +160lbs/acre or +72kg/4050m² or 18 g/m2
Biodiversity - Trimming after flowering but before seed is set will supply native invertebrates with nectar and pollen, and prevent the spreading of the plant. A good bee plant and food plant for many caterpillars, it provides the food for the larvae of the green hairstreak butterfly. Ants are attracted to the seeds, feeding on the juicy attachment that holds them to the pods and thus distributing the seed.
Planting Material - 1st or 2nd year plants can be used and will quickly establish large crowns. Dislikes root disturbance, especially when more than 20 cm tall. It is best to plant out into their permanent positions as early as possible.
Propagation: The plant is very easy to grow from seed and large quantities of plants can be grown very quickly. Seed harvested in the summer can be sown straight after picking and overwintered indoors (or protected and planted out the following autumn). Seeds germinate better after soaking in warm water for 8-12 hrs prior to planting.
Elaeagnus umbellata - Autumn Olive. Autumn Elaeagnus
 |
| Permaculture Plant - Elaeagnus umbellata |
Overview: A large deciduous shrub from E.Asia, growing 4.5 m high and 4.5 m wide, hardy to zone 3 (-35C) tolerates part shade, very drought tolerant. Branches are often thorny, leaves are bright green and silvery beneath. Yellowish white, fragrant flowers are produced in May-June, followed by rounded silvery brown (ripening red) fruits in Sep-Oct. Sometimes cultivated for its edible fruit. There are many named cultivars. Flowers are rich nectar and very aromatic. Plants can fruit in 5 yrs from seed. This specie is considered invasive in the U.S
Uses: Edible fruit raw or cooked which is very tasty and can be made into jams, preserves etc. The fruit contains about 8.3% sugars. 4.5% protein. 12 mg per 100 mg Vitamin C. The harvested fruit stores for approximately 15 days at room temperature. It can be used as a hedge plant and tolerates maritime exposure succeeding in the most exposed positions. The nectar from the flowers is attractive to bees comprising 28% sugars. The plant is used as a nurse tree, when planted with fruit trees it is reported to increase the overall yield of the orchard by 10%. It can also be grown as a biomass crop on a 3 year rotation.
Nitrogen Fixing Potential: The species is classified by USDA as being a MEDIUM nitrogen fixer with estimated yields of 85-160lbs/acre or 39-72kg/4050m² or
14 g/m2
Biodiversity - The shrubs will begin to flower in the 4th or 5th year after planting and are attractive to a wide range of pollen and nectar feeding invertebrates. If you leave some fruits on the tree they provide a good source of winter food for birds. In time as the hedge thickens up with regular pruning, suitable nesting habitat will form inside the lower part of the hedge. Birds such as Wren, Chiffchaff and Robin are commonly found in dense low hedging. These birds can help to keep common vegetable pest populations low.
Propagation: Seed - best sown as soon as it is ripe in a cold frame. It should germinate in late winter or early spring, though it may take 18 months. Stored seed can be very slow to germinate, often taking more than 18 months. A warm stratification for 4 weeks followed by 12 weeks cold stratification can help. The seed usually (eventually) germinates quite well. Prick out the seedlings into individual pot as soon as they are large enough to handle and plant out when they are at least 15 cm tall.
Planting Material – 3 year old plants will provide an instant hedge effect but can prove expensive when planting out large areas. 1st year whips are cost effective and with proper pruning and some attention during the first few years of development will quickly fill out.
These plants can be grown from seed although may take up to 18 months to germinate. Once they do germinate they can be ready to plant out 7-8 months later and can starting providing good quantities of biomass within a few years.
N.B I'm not sure how the Nitrogen fixing potential of the above species are calculated and the relationship between regular pruning and N input into soils, but it's something I intend to look into further. If anybody can clarify this matter please comment below.
CAUTION - These are pioneer plants, their ecological role is to take position in disturbed sites and sites of poor fertility. In doing so they restore soil health and build fertility eventually giving way to more permanent plants. If allowed to seed these plants will quickly colonize disturbed sites such as vast areas of plowed fields that have been extensively cleared of nearly all wildlife to cater for industrial agricultural practices. Because of the tendency of these plants to establish quickly in these areas they are often referred to, rather ironically, as noxious and invasive species. There may be some examples of these plants displacing healthy native floral communities but not that I have witnessed.
2. Nitrogen Fixing Ground Cover
 |
| White Clover - Trifolium repens under the shade of a Walnut tree in our forest garden four months after sowing. |
A perennial Nitrogen fixing ground cover should be established quickly in the pathways and on the vertical edges of the bed to protect the soil from erosion and provide a further source of Nitrogen input to the polyculture. I have experience using White Clover - Trifolium repens for this purpose but there may be other suitable species.
Sowing the Ground Cover
Following digging out the pathways, slightly loosen the surface of the path with a rake and hand sow the white clover seed onto the surface of the path and into vertical edges of the beds at a rate of 0.75 g per m length of bed. Tamp down with a shovel and water with a fine head sprinkler. The seed should germinate within 5 - 6 days. The best time to sow is late April - mid June. Keep a close eye on the emerging seedlings and irrigate when below the soil surface is dry. Keep foot traffic to an absolute minimum whilst the cover is establishing.
Maintaining the Nitrogen Fixing Ground Cover
Once established the cover will tolerate light foot traffic, i.e, related to the management of the polyculture. If the pathway is used extensively its unlikely productive cover will establish although cover on the vertical edges of the beds will do. The pathway cover can be cut the following spring after sowing and then on each occasion after the comfrey is cut. The trimming can be emptied around the base of the cut comfrey plants. A lawnmower with a maximum width of 50 cm with a catch bag is ideal for mowing the pathways. If you mow up and down the path with one wheel on the edge of the bed in one direction and one wheel on the other edge of the bed in the other direction you can also effectively cut the bed margin growth too. Allowing some patches of the clover to flower and seed provides a good source of nectar/pollen to native bees and a bank of seed in the soil for self resowing.
Nitrogen Fixing Ground Cover Species Overview
Trifolium repens -White Clover , Dutch Clover, Ladino Clover
 |
| Plants for Pathways - Trifolium repens - White Clover |
Overview: White clover is a dwarf, prostrate, mat-forming perennial that can spread via stems which freely root along the ground at the nodes. Easily grown in average, medium, well-drained soils in full sun to part shade. Prefers moist soils in light shade, but tolerates full sun and moderately dry soils.
Uses: White clover has been described as the most important forage legume of the temperate zones. Besides making an excellent forage crop for livestock, clovers are a valuable survival food: they are high in proteins and although not easy for humans to digest raw, this is easily fixed by boiling the harvested plants for 5–10 minutes. Dried flower heads and seedpods can also be ground up into a nutritious flour and mixed with other foods, or can be steeped into an herbal tea. The plants ability to spreads aggressively by creeping stems makes is a good ground cover plant. The plant is also used as a companion plant when undersown with cereals or tomatoes.
Nitrogen Fixing Potential: The species is classified by USDA as being a HIGH Nitrogen fixer with estimated yields of +160lbs/acre or +72kg/4050m² or
18 g/m2
Other sources state up to 545 kg of N per hectare per year is possible.
Biodiversity: The plants provide a source of nectar and pollen for a number of native bees as well as the honey bee.
Propagation: Best propagated by seed. Pre-soak the seed for 12 hours in warm water and then sow in spring in situ. Division is also possible in the spring and autumn.
Planting Material: For covering an area quickly seed is the best option.
We supply Trifolium repens - White Clover seed from our plant nursery -
Click here for more info.
3. Comfrey Beds
The comfrey beds provide copious amounts of biomass rich in Nitrogen, Phosphorus, Potassium, Calcium and many other valuable plant nutrients that the plants mine deep in the subsoil. The plants can produce 2 m long roots that harvest these nutrients and relocate them into the plant biomass back on the surface. The biomass is used to feed crops in the garden
 |
| Comfrey Patch Layout |
Planting out the Comfrey Patch
Spacing - The plants should be spaced 60 cm apart in rows and 60 cm apart at diagonals between rows. Plant the rows 15 cm from the edge of the beds.
Maintaining the Comfrey Patch
Cutting - In the first year allow the plants to establish so that the roots develop well and penetrate deep into the subsoil. The following year the cuttings can begin. You can scythe the beds for a quick harvest or cut each plant individually with a pair of secateurs or hand sickle. Cut to 5 or so cm from ground level. The leaves are prickly so if you have sensitive hands wear gloves. You can cut the comfrey as the flowering stalks emerge up to 4 times a year. Allow the plants to flower at least once during the season to provide bee fodder to a range of native bees as well as Honey bees. Leave the last flush of leaves before the winter so that invertebrates can find winter shelter in the undergrowth.
Feeding - After you have cut the comfrey, mow the pathways between the beds and empty the contents to the base of the comfrey plants. Any mowings from the surrounding area can be used in a similar way. As the Nitrogen fixing hedge establishes, they should be trimmed to the required height and shape with the trimmings also applied to the comfrey. This can be done once a year for the first 4 years but biannually as the hedge develops. For extra feed and to increase yields
undiluted urine can be applied to the plant at a rate of approx 1L per plant twice per growing season. Urine is an excellent feed for comfrey.
Irrigation - Comfrey will produce more biomass if irrigated and in dry climates it's essential to irrigate. Comfrey plants wilt very fast in hot conditions and will stop photosynthesising at this point.
20 L m2 / week should be more than adequate. The beauty of biological systems are that if they are managed correctly, each year the soil in the beds will improve resulting in less water required and higher yields.
Comfrey Beds Species Overview
Species - Symphytum x uplandicum - Comfrey 'Bocking 14'
 |
| Permaculture Plant- Comfrey - Symphytum x uplandicum 'Bocking 14' |
Overview - 'Bocking 14' is a hybrid comfrey plant developed in the 1950's by an original ecotrepreneur Lawrence D Hills specifically for its ability to produce tremendous quantities of biomass. Comfrey is adaptable to many soils, but prefers moist, fertile soils. Thin soils over rock will give a poor crop, but on light sands and loams, this crop will be productive if adequate nutrients are present. Comfrey productivity is not very sensitive to soil pH, but highest yields occur on soils with a pH of 6.0 to 7.0. For more on this incredible plant see a previous post
Comfrey - Believe The Hype
Uses - The healing properties of this herb are well renowned, making it an essential first aid plant. The beautiful flowers are highly attractive to a wide range of bees including Apis mellifera - western honey bee. Comfrey has a long history for use as an animal feed. The leaves are best received by animals wilted. Fresh leaves can be eaten by pigs, sheep, and poultry but cattle, rabbits and horses will prefer to consume wilted leaves. Research indicates that a comfrey solution can be used to prevent powdery mildew. Pest predators such as spiders, lacewings and parasatoid wasps associate with this plant. It's best to leave some plants alone in order to sustain pest predator relationships.
Uses - Mulch - Freshly cut comfrey leaves make good mulch because they're high in Nitrogen, so they don't pull Nitrogen from the soil while decomposing, as high-carbon mulches like straw and leaves do. Comfrey's high potassium content makes it especially beneficial for vegetables (such as tomatoes, peppers, and cucumbers), berries, and fruit trees. With adequate feed and watering, we've seen yields of 2 - 3 kg of biomass per plant per cut. Plants can be cut up to four times in a year.
 |
| One of our comfrey beds before and after the first cut of 2016. |
Uses - Liquid Fertliser - What I like to call "Comfert". Fill a barrel, preferably with a bottom tap and a gauze on the inside (to prevent clogging) about 3/4 full with fresh cut comfrey and add water to fill the barrel. Cover it, and let it steep for 3 to 6 weeks. The smell from the resulting liquid is far from attractive so approach with caution :) The tea may be used at full strength or diluted by half or more. Don't apply before heavy rain is forecast as most of the nutrients suspended in the liquid will wash straight through the soil. For the best results apply the feed to your vegetables when they are in most need of the extra fertility. This will be different for each crop, for example, tomatoes are best fed when they are setting fruit and then any time during the fruiting period. Applying comfert before this can be counter productive and make your plants more susceptible to pest problems. The black slurry at the bottom of the barrel can be dispersed evenly back over the comfrey patch.
Uses - Liquid fertilizer concentrate: "Comfert Plus" can also be made by packing fresh-cut comfrey tops into an old bucket, weighing them down with something heavy, covering tightly, and waiting a few weeks for them to decompose into a black slurry. You can put a hole into the bottom of the bucket and collect the concentrate in another container as it drips out. Dilute this comfrey concentrate about 15 to 1 with water, and use as you would Comfert. You can seal this concentrate in plastic jugs until you are ready to use it.
Biodiversity - The last growth of comfrey leaves can be left uncut before the winter. The leaves can provide habitat for nesting spiders and invertebrates. Allow the plants to flower at least once between cuts to provide bee fodder to a range of native bees as well as honey bees. Cutting back the flowering comfrey when neighboring crop plants are in flower will drive the pollinators to your crops, increasing the likelihood of successful pollination.
Propagation - Root cuttings are the only way to propagate 'Bocking 14'. The cuttings should be grown on in small pots and planted out in the spring as soon as the first leaves emerge.
Planting Material - You can plant out with crown divisions or root cuttings. A crown division is simply putting a spade through the centre of a mature comfrey plant and transplanting the divided sections. I divided the crown into quarters and these established very well in the first year. Do not cut the plants in the first year in order to allow a deep root system to develop.
In 2016 we started our comfrey trials measuring the inputs and outputs of a 13 m2 patch of Comfrey. For information on this trial
see here.
We offer both root cuttings and crowns from our bio nursery 100% biologically grown.
Click here for more info
The Biomass Belt in Our Market Garden
The hedge of fast growing Nitrogen fixing shrubs are planted into 70 cm wide "no tread" bed rows that run parallel to 1.30 m wide "no tread" bed rows of Comfrey 'Bocking 14'. In between the beds are 50 cm wide pathways that are sown with a Nitrogen fixing ground cover such as Trifolium repens.
 |
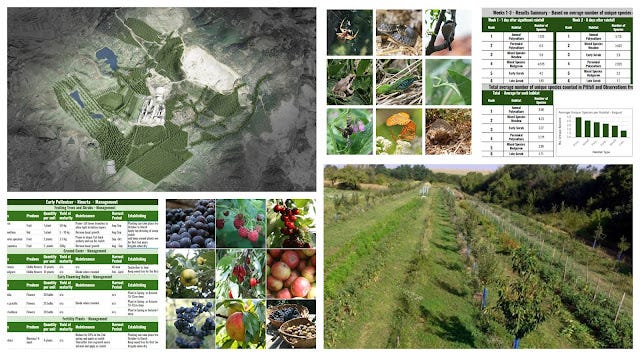
| The biomass belt is located in the red box in the above image of our Polyculture Market Garden. |
The beds run lengthwise west to east with the comfrey beds on the south and the nitrogen fixing hedge on the north. This is to maximise plant exposure to sunlight. The beds and paths are laid out on contour with the beds elevated around 10 - 15 cm above the surrounding pathways. We irrigate the beds by diverting stream water into the paths and dropping sandbags at various ends to control the level. We can raise the water level in paths to approximately 15 cm resulting in the thorough absorption of water into the bed soil. Water is drawn up towards the surface of the bed via capillary action.
We produce liquid fertilser from one of the comfrey beds with the other bed used for harvesting comfrey root cuttings that we sell from our
bio-nursery.
The liquid fertiliser provides a great supplemental feed in our young raised beds. As the garden beds develop overtime, soil conditions will improve and the liquid feed is less necessary. At this point the comfrey biomass will be applied directly to the beds as a mulch.
A word of awareness. This is not a tried and tested model, rather it has been formulated based on decades of working with plants and running successful productive ecosystems. and is largely based on extrapolating from my experience of what works on a small scale. We are keeping records of the polycuture yields to see how well they perform and will publish these at the end of each year.
Support Our Project
If you appreciate the work we are doing you can show your support in several ways.
--------------------------------------------------------------------------------------------------------------------------
Some of the species profiled in this post include extracts by Martin Crawford, Director of
Agroforestry Research Trust from the excellent quarterly publication Agroforestry News Vol.4 No.3. I highly recommend
subscription to this journal as essential reading for all who are interested in temperate tree crops and agroforestry and perennial polycultures.
Acknowledgement and gratitude to Ken Fern for establishing the excellent
plants for a future database that we use extensively both for rearing and caring for our plants and for writing our plant profiles.