
Topographic maps are a powerful tool that unveils the landscape's three-dimensional features on a two-dimensional sheet. These maps utilize contour lines to portray the elevation variations of the land, allowing readers to grasp the lay of the land and its intricate details. Let's delve into what topographic maps are and how to interpret them effectively.
Topography or topographic map is composed of contour lines that connect points of equal elevation on the land, meaning if you physically walked along a contour line, your height above sea level would remain constant.
Topographic maps show lines for certain elevations only. The elevation difference between each line is called the contour interval and can vary depending on the detail required. For example, architect plans for a house may have a 25cm contour interval and a trekking map may have a 5m contour interval. The contour interval is the difference in height between the two lines, not the on-ground distance between the two lines. A topography map with 1-2m contour intervals is generally adequate for polyculture design.
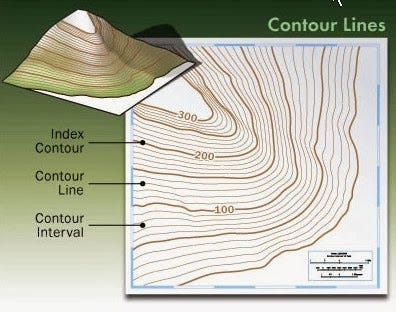
You can often find a darker line on a contour map which is called the index contour and it’s usually every fifth contour line, having a number on it that marks the number of metres above sea level of that line. It's often impractical to mark the elevation of every contour line on the map, hence the index contour lines are the only ones labelled. If you are looking at a 2D contour map, you can work out the slope direction by using the index contour. The index contour may also be used to determine the contour interval if the map does not indicate this elsewhere.
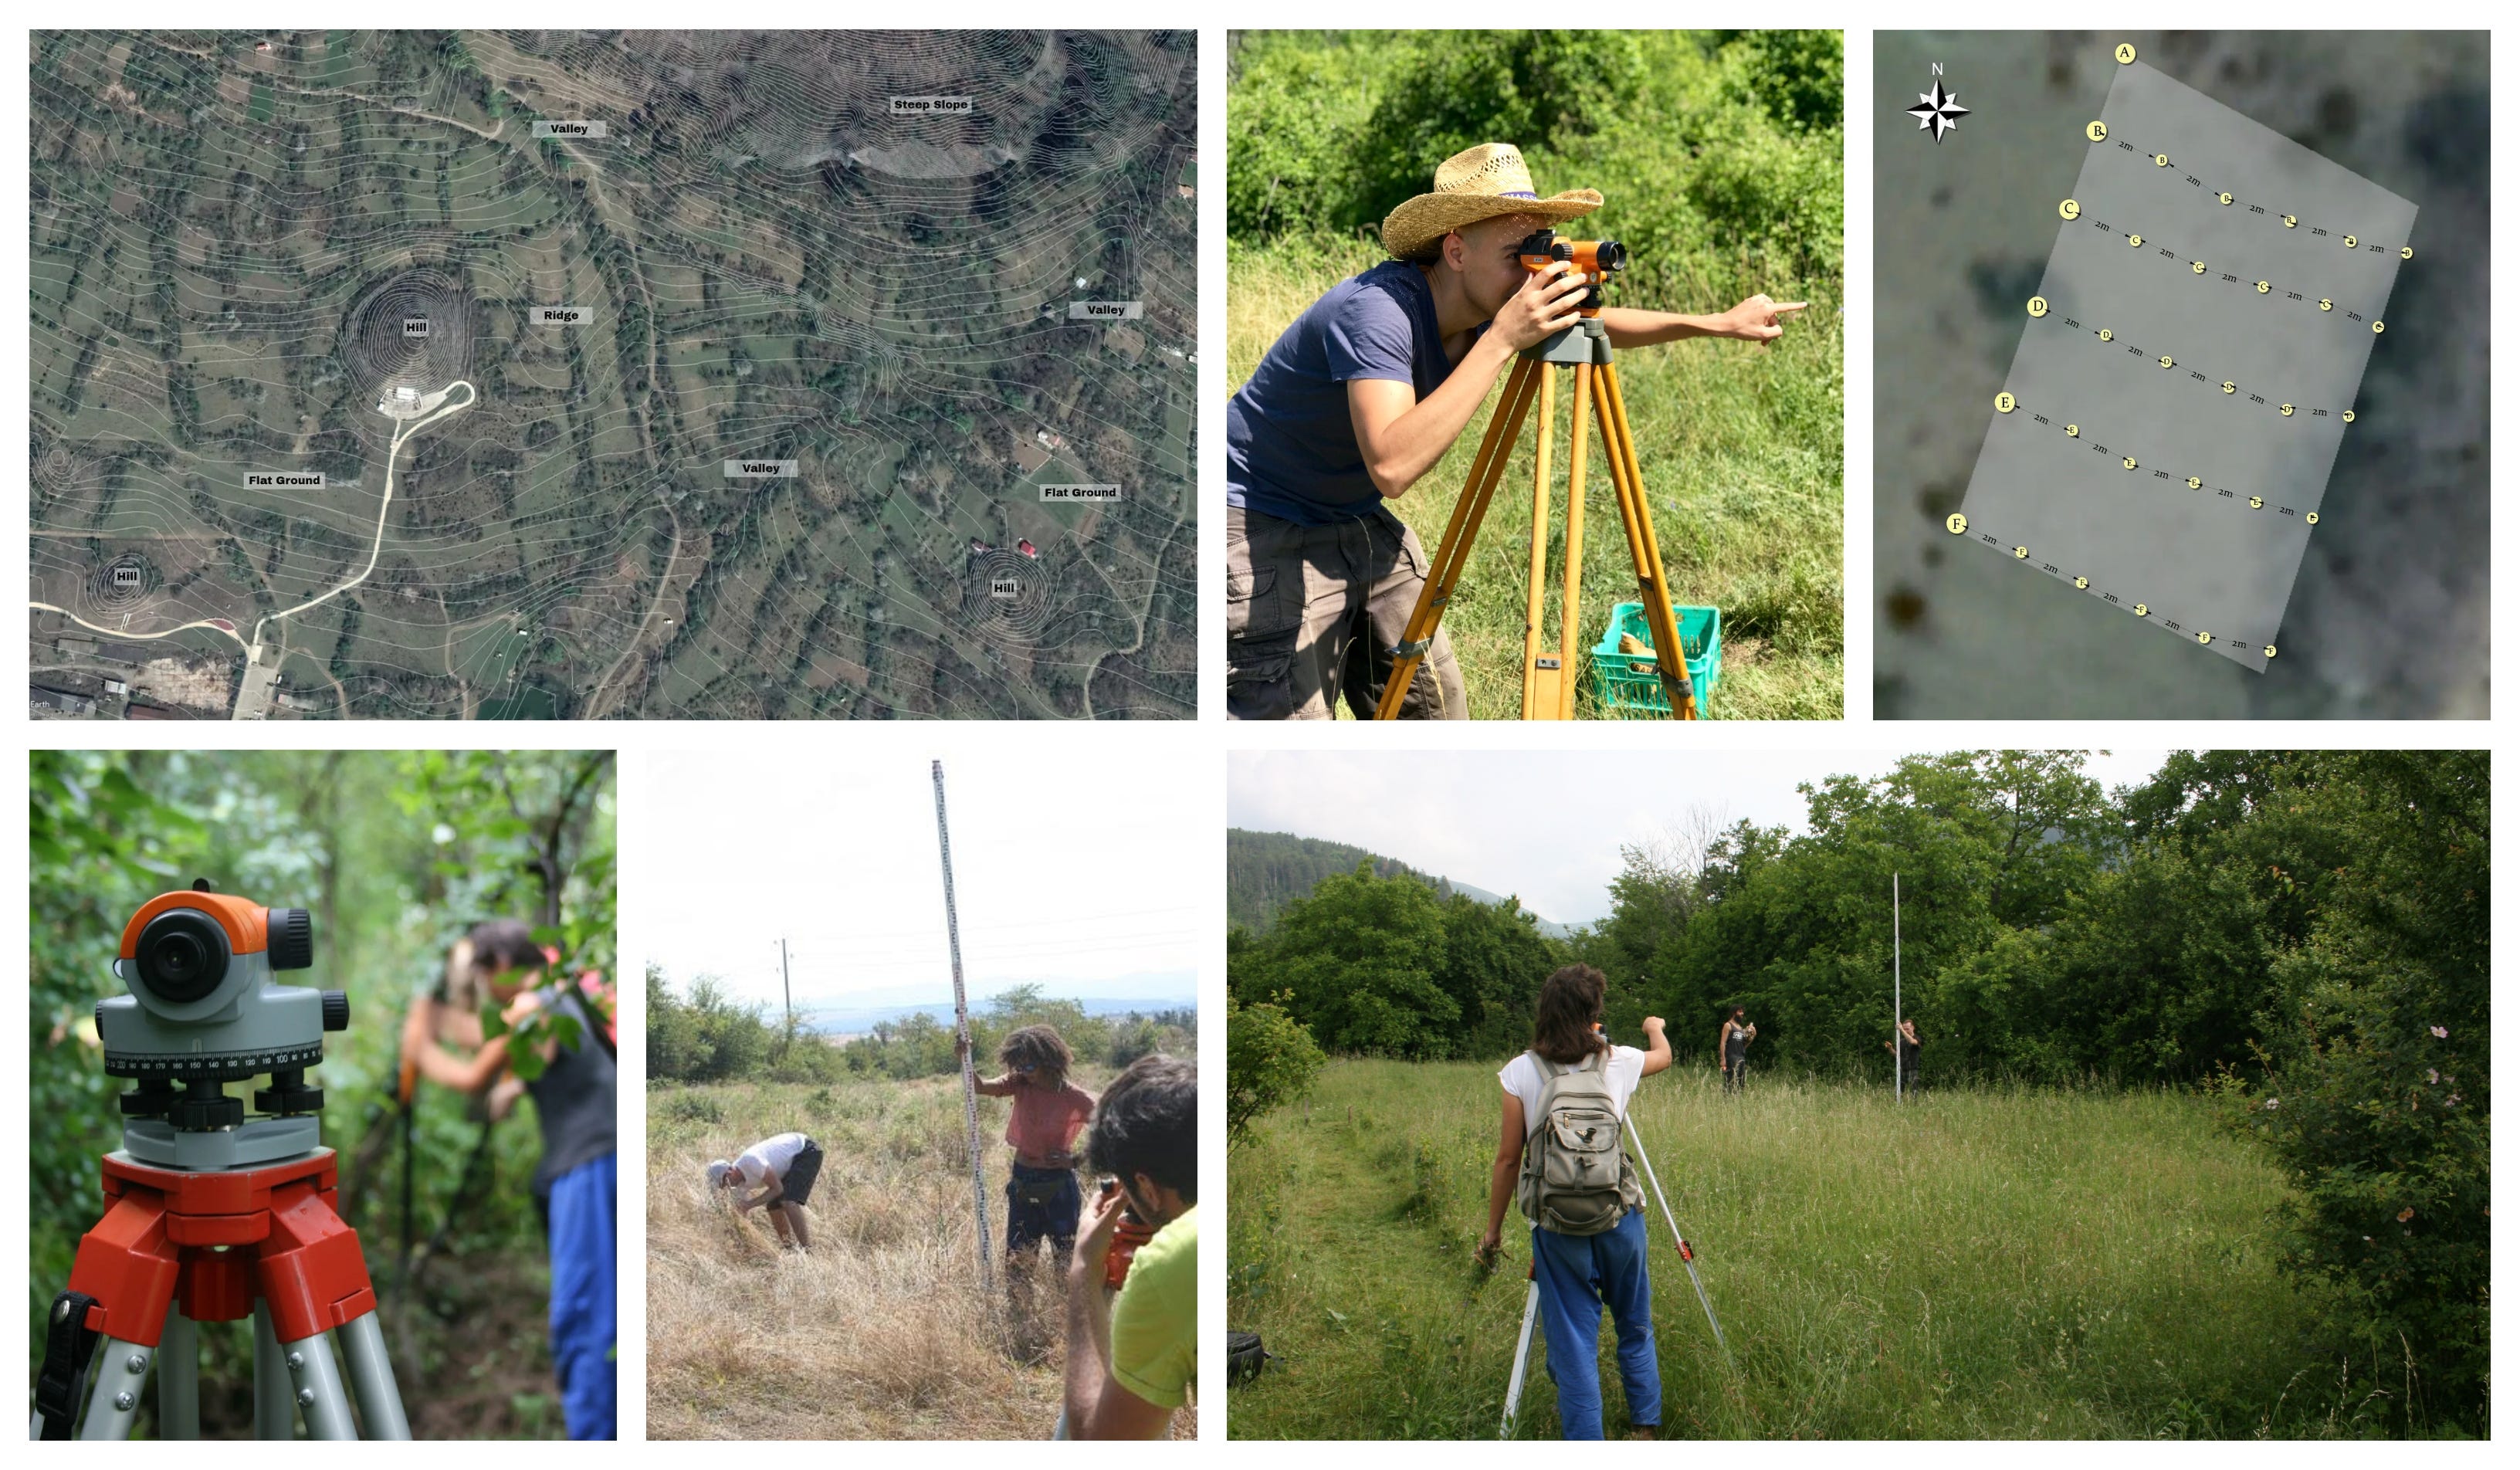
The basic way to read the map is that if the lines are close together, it indicates a steep slope and if the lines are far apart the terrain is relatively flat. If you are seeing circles on your map this is either a hill or mountain top or rarely a crater. Where you see lines that look like V’s or U’s this indicates a ridge or a valley.

Topographic maps are more than just ink on paper; they're portals to the intricate world of elevation, shape, and form. Armed with the ability to decipher contour lines, understand index contours, and grasp the nuances of slope and landforms, individuals can harness the power of these maps for a multitude of purposes. Whether you're a landscape designer, cartographer, an architect, a hiker, or simply a curious explorer, topographic maps offer an invaluable glimpse into the Earth's surface that stretches beyond the limits of your eyes.
Want to learn more about Regenerative Landscape Design? Join The Bloom Room!
The Bloom Room is designed to create a space for more in-depth learning, for sharing projects and ideas, for seeking advice and discovering opportunities.
Ultimately, it aims to build a more intimate, interactive, and actionable relationship between members, a way for the Bloom Room community to support each other’s projects and learning journeys, and to encourage and facilitate the design, build, and management of more regenerative landscapes across our planet.
What you can expect as a member of the Bloom Room
As a member of the Bloom Room you can expect;
Access to an interactive forum where you can ask questions, direct what type of content you would like to see as well as share your own content and projects.
Monthly live session featuring general Q&A and tutorials on design software for creating and presenting polycultures.
Live session every month for members to showcase your projects, plans, designs, and gardens, with guest speakers from the community.
Full Access to all of the content on Substack
A 50% discounts on all of our online courses
Future opportunities to join our Global Regenerative Landscape Design and Consultancy Service, with potential roles for those with the will and skill to join our design team.
An opportunity to take part in the group ownership of a Regenerative Landscape. You will find more details on that here.
Become a paid subscriber to our Substack to join. The annual subscription is currently $70 and the monthly subscription is $7 (monthly subscription excludes discounts for products and services) . You can join here, we look forward to meeting you!
Making a topography survey of your site
When working with topographic maps they may not reflect the current topography of a site so it’s good to check that the topography of the site matches up with your topography map. This is normally carried out during the initial site survey so that your design reflects the actual shape of the land.
There are various tools we can use to measure topography, from simple handmade A-frames to laser levels. We generally use a transit level for our designs and it’s worth having such a tool in the kit as they are useful for a variety of other tasks, such as leveling the banks when building a pond, finding levels for structures and walls and for making amendments to channels and earthworks around your site. It’s also possible to use a transit level to make accurate hand drawn base maps and to find the relative location of design elements on a site.

What follows is a description of a simple topography survey we will make during the initial site survey when starting a new garden. We’ll often make these surveys with a 50cm contour interval, pegging out our contour points 2m apart, but this can be larger or smaller depending on the size of the area, the steepness of the slope and the level of detail required.
I’ll use the below 550m2 site as an example of how we carry out our topography survey. A simple survey like this can help us to plan the placement of water harvesting earthworks, irrigation channels, access layout and planting layout as we have seen in previous chapters.

We start at the highest point - in this case the north west corner of the site, and place a benchmark peg in the ground here (point A). We use this benchmark to establish 50cm drops in elevation along the western boundary of the property as you can see in the below image. At each point we hammer in a peg to mark where we will start to measure the contour lines from in the next stage of the survey.
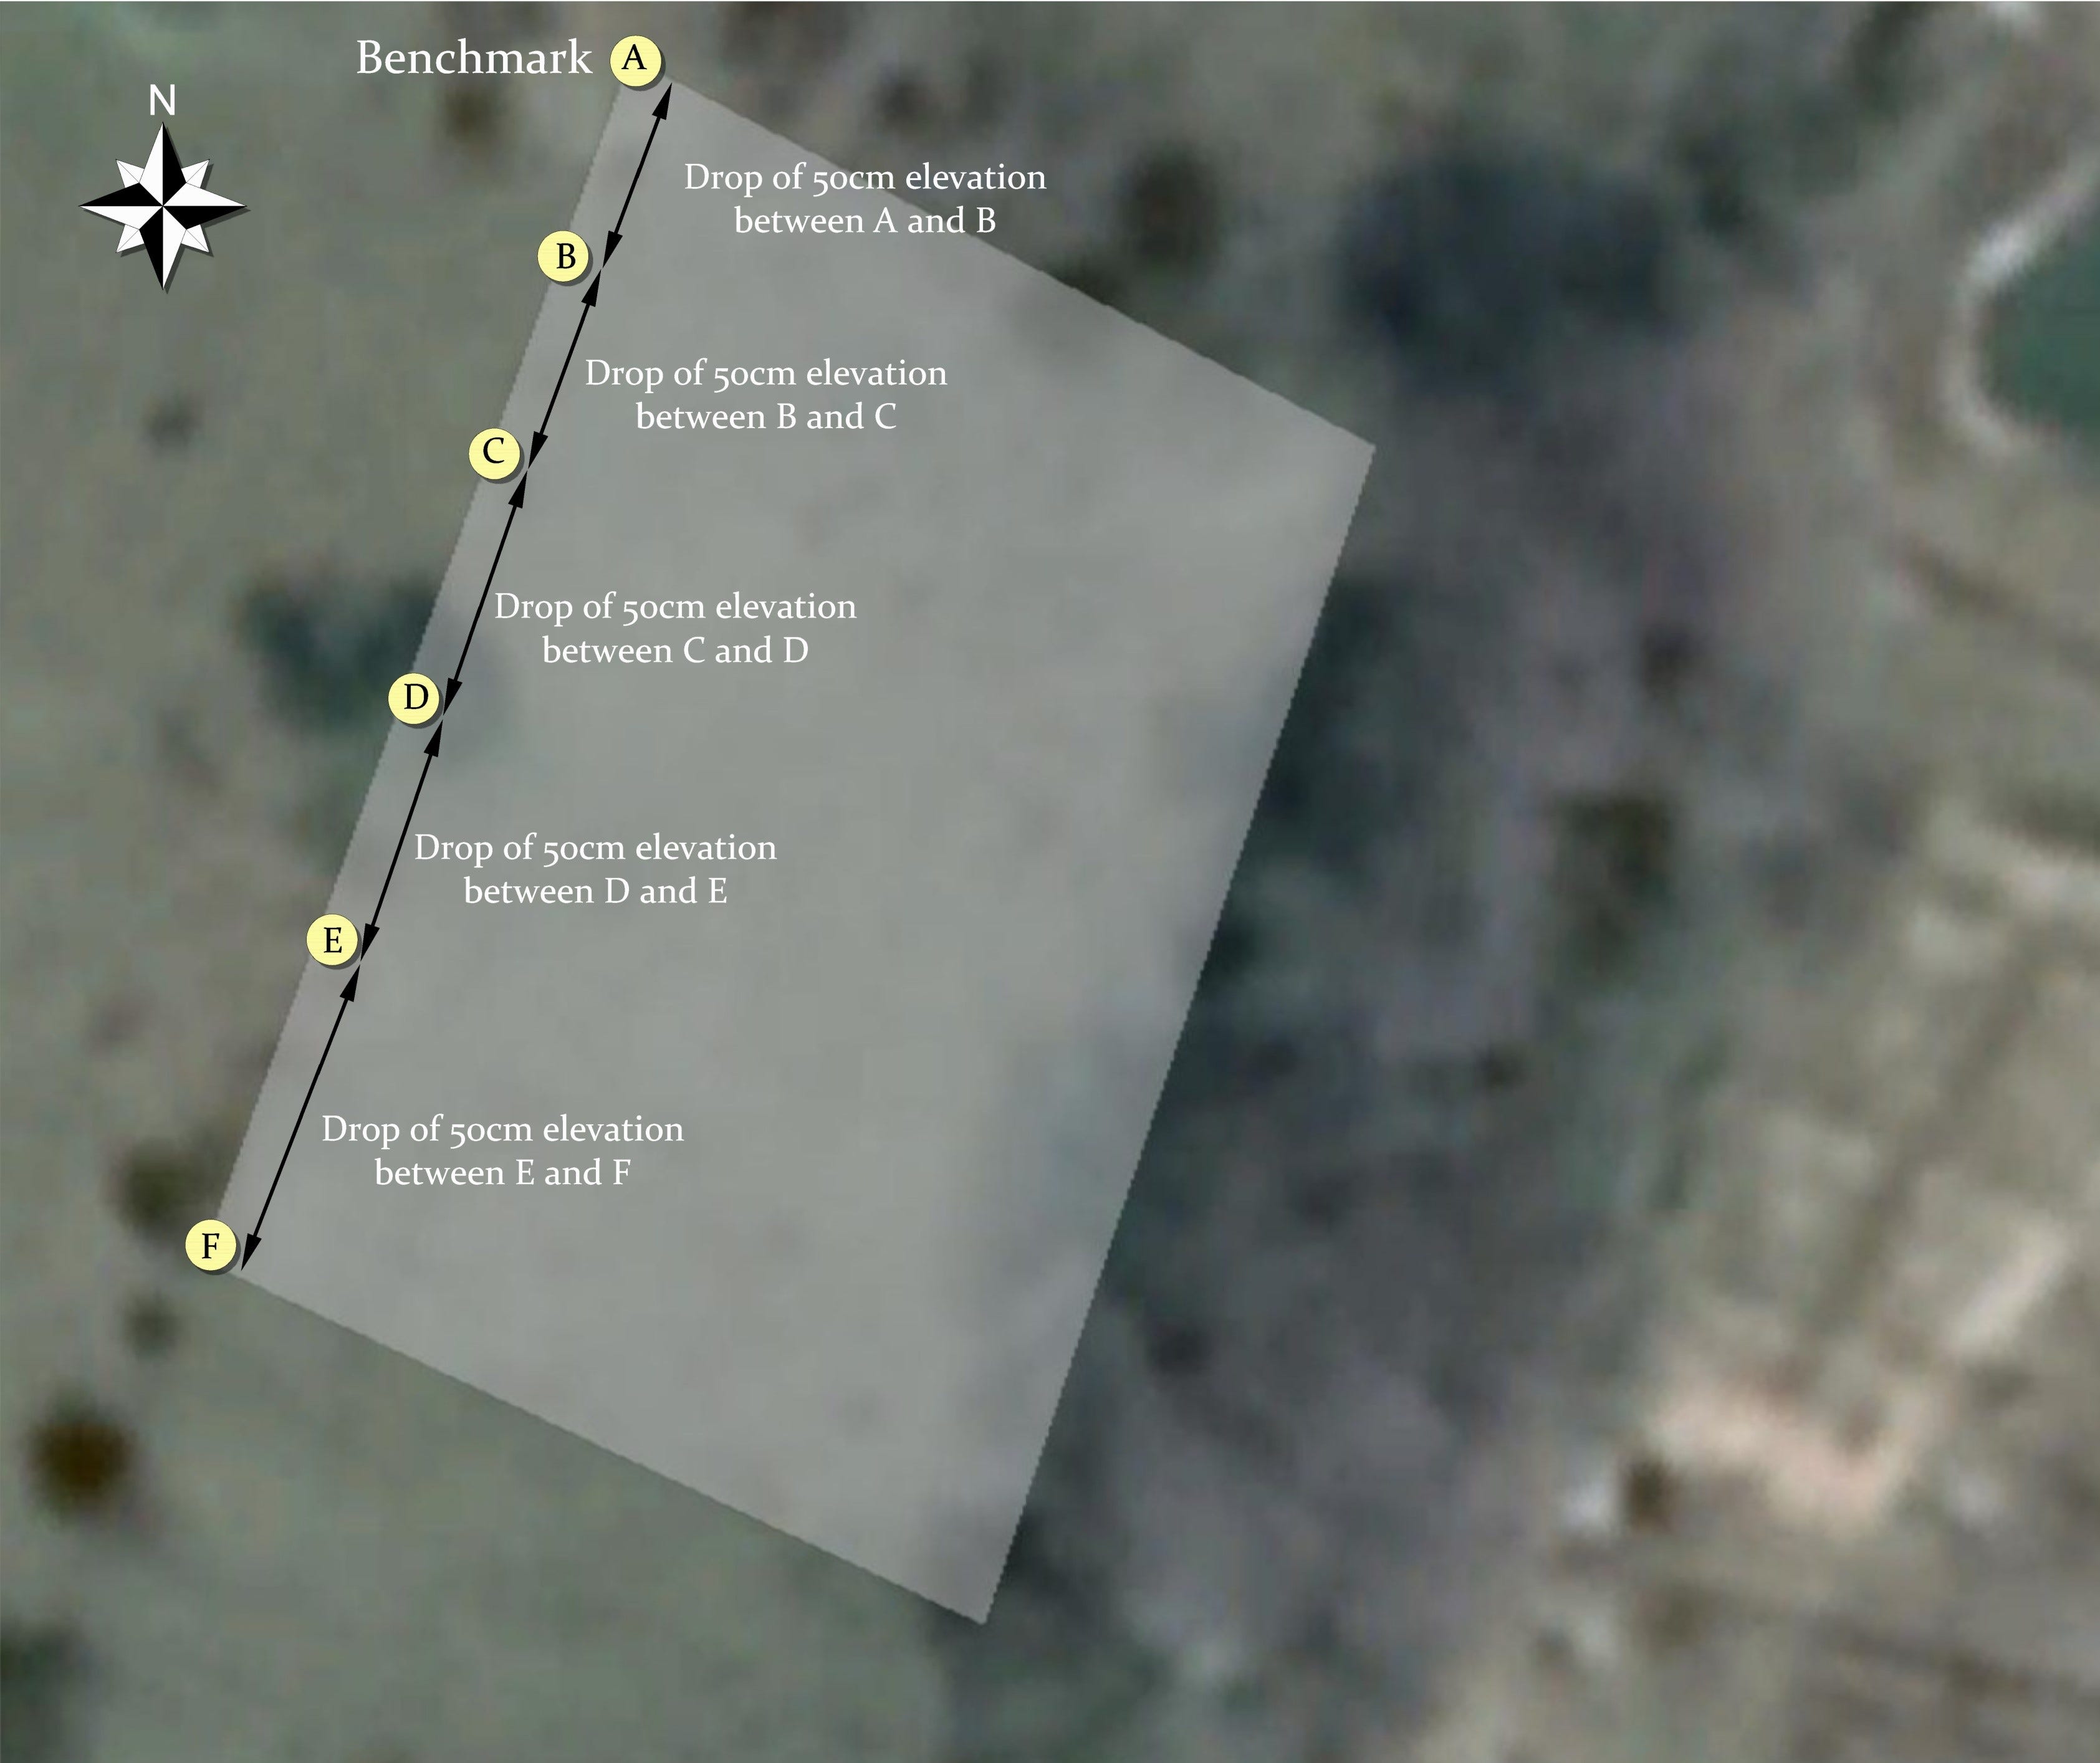
Once we have the 50cm contour intervals marked on the site we use these points to establish contour lines from each of the contour intervals. For a site of this size we’ll take a reading with the transit level every 2m and drop a peg where we find the level until we reach the boundary. When we have reached the boundary, we’ll back check all of the points and if they are all equal to the benchmark we’ll attach string to the pegs in order to clearly see the line on the site. In this case we did not peg out a contour line from benchmark point A as it does not fall within the boundaries of the property so we started from point B.

If the on-site topography does not match that of your DTM or overlay map then it will be necessary to overlay the correct topography onto your map in order to build the design around it.
If you have a drone and software to take orthophotos with the drone, photos can be taken of the site following the topo survey and used as your base map. Contour lines that have been established on the site will need to be made clearly visible for the drone camera to pick up. Spray paint, white rope or etching lines in the soil will work on smaller open sites like the one portrayed above.
On densely vegetated sites including lots of trees and shrubs, it can be very difficult to carry out a topography survey with many movements of the transit level required to ensure you have a view from the transit level to the staff. Generally speaking, if an area is densely vegetated it’s best to leave that area as support habitat and focus on areas that are already open. On some sites where there is very little topography to work with, the topography survey does not need to be carried out beyond identifying the high and low points of the site, and general direction of the slope.
Support Our Project
If you appreciate the work we are doing you can show your support in several ways.
Become a member of the Bloom Room. A $70 annual or $7 per month subscription to our Substack provides you with access to live sessions, design tutorials, a members forum and more, see details here.
Make a purchase of plants or seeds from our Nursery or Online Store
Joining us for one of our Practical Courses or Online Courses
Comment, like, and share our content on social media.
We offer a diversity of plants and seeds for permaculture, forest gardens, and regenerative landscapes including a range of fruit and nut cultivars. We Deliver all over Europe from Nov - March. - Give a happy plant a happy home :)

Welcome to our Online Store where you can find Forest Garden/ Permaculture plants, seeds, bulbs, and Polyculture multi-packs along with digital goods and services such as Online Courses, Webinars and eBooks. We hope you enjoy the store and find something you like. It's your purchases that keep our Project going.

You can also find our full list of trees. shrubs and herbs for forest gardens on our nursery website.
Regenerative Landscape Design - Online Interactive Course
Want to learn how to design, build and manage regenerative landscapes? Join us on our Regenerative Landscape Design - Online Interactive Course. We look forward to providing you with the confidence, inspiration, and opportunity to design, build and manage regenerative landscapes, gardens, and farms that produce food and other resources for humans while enhancing biodiversity.
You can find the course details here and at the moment we have a $300 ( 20%) discount for full enrollment to the course. Just use RLD2024 in the promo code section of the registration form to receive your discount.